Thursday, March 24, 2011

ISO, Shutter Speed, F-stop Examples

THis entry has 11 photographs with brief explanations of my choices for ISO, shutter speed and F-stop.  I will try to remember to post them with my photographs on Facebook also.

This first photograph is of Horse Bend just outside Page Arizona.
ISO 100, shutter speed,  Shutter speed 1/25, F-stop 22 (F22).  My primary concern was to have the whole photograph sharp and is the reason for the high F-stop.  Since there was no motion shutter speed was not a concern.  I did want to risk any digital noise so I used a low ISO 100.


F4, 1/500 Shutter Speed, ISO 400.  I wanted to freeze motion, and used 1/500.  The elevated ISO was to insure the shutter speed, and F4 was to provide sufficient depth of field.

F5.6, 1/640, ISO 800.  This the highest ISO I trust for my camera.  I wanted to freeze action, and still didn't.  Little buggers are hard to stop.  I would have liked to get to 1/1000 but I would have underexposed the shot.  THe F5.6 is the lowest I can achieve with this lens.  Don't you just love the flowers?

F4,1/2500, ISO 200.  Here I wanted to freeze action.  THe primary consideration was the shutter speed, and is the reason it was so high.  The F-stop was set to insure she was sharp, and the ISO was slightly elevated to help with the shutter speed.

Dallas.   F2.8, 1/25, ISO 800.  There was hardly any light.  So I raised to the highest ISO I trust, shot at the slowest shutter speed I trust, and set the F-stop to the lowest the lens would handle.  Not bad for hand held.

Las Vegas. Bellagio Fountain at night.  F2.8, 1/25, ISO 400.  I could have made a couple of changes here.  I should have raised the ISO to 800 and raised the shutter speed to 1/50 or there abouts (new word).  On the other hand the motion of the water did not hurt that much.  Many people when they shoot a pic like this use a flash, but I suggest not doing so.  The flash isn't strong enough to do any good.  Just go with the light on the fountain.  There was enough light.  I also shot this through glass.  The flash would have ruined it.  The light would have bounced off the glass and made an ugly.  You might as well turn off the flash if there is glass.
F9, 1/500, ISO 100.  Well here I went over to the ugly side.  Almost makes me shutter to think I'm posting this "pic".  I needed a faster shutter speed or a slower bird.  I could have used a lower F-stop, or higher ISO.  Then I could have gotten a faster shutter speed.
 F7.1,  1/2500, ISO 200.  THe challenge here was to stop motion, and is the reason for a high shutter speed.  The F-stop could have been higher and maybe the birds would have been sharper.  The ISO was to help with the shutter speed.  I stood and shot for about an hour.  I had never shot waves like this and needed to find a setting that would work.
F1.4, 1/6400, ISO 200.  My idea here was to focus attention on the stamen.  I chose the shallow depth of field, and the high shutter speed to off set it.
F8, 1/800, ISO 200.  I was hoping the purple ones would be sharp, but they weren't.  I should have used a slower shutter speed and a higher F-stop.
F22, 1/10, ISO 50.  Here to get that flowing look of the water fall required a slow shutter speed.  I had to use a tripod.  THe F-stop setting and ISO were set to help get that slow shutter speed.

I hope these examples help you understand ISO, F-stop, and shutter speed.  I have not told you all the whole story though.  All DSLR's have settings allowing the photographer to decide the F-stop and letting the camera to decide the shutter speed or the photographer to decide shutter speed and the camera to decide the F-stop.  I can not help much with the settings, because each manufacturer is different.  I suggest you find something stationary and mess with the settings.  Go ahead over/underexpose a few photographs and change each of the settings, you will learn.  You will start to recognize the trade off among ISO, shutter speed, and F-stop.

There is another dynamic about depth of field I should have discussed.  THe distance that is sharp changes as you get closer or further away from the subject.  As you get closer the distance that is sharp will get smaller, and if you get further away it will get greater.  Now I know there is a scientific explanation for this, but you will not find it here.  It is just not my cup of expresso. So anyway if you are 100 feet away from the subject maybe 2 feet will be sharp, but if you are 10 feet away only 4 inches will be sharp.  Now just so you understand I just made all those numbers up.  I'm just hoping you understand.  If not well write me.

I have had a couple of people talk to me recently about wildlife photography.  They wanted to know how to get those photographs.  Wild life photographers are good hunters.  They have learned patience.  They can wait on a subject for a long time.  They get to understand the subject's habits.  They have equipment ready.  I will usually put my 400mm lens on the camera before leaving the house or car.  I will set it at the fastest shutter speed the light will allow and then adjust ISO and F-stop accordingly.  There is just not a way to set ISO, shutter speed, or F-stop as turkeys fly off or deer bolt.   It just doesn't happen.

Next time light outside the camera.


Friday, March 18, 2011

F-stop

Here it is the last way to control light in camera.  It is called F-stop.   The F-Stop in days gone by was set on the lens, but now it is controlled usually by a wheel on the camera.  It is stated using numbers like 1.4, 2.8, 4, 5.6, 8, 11, 16, or 22.    It is the result of a opening in the shutter.  The smaller the number the larger the opening and more light is allowed to the sensor.  The larger the number the smaller the opening and less light gets to the sensor.  So, at an F-stop of 4 more light gets to the sensor than at F-stop 16.  As with ISO and shutter speed there is another dynamic.  It is called depth of field.

Before I continue I must admit ignorance.  I know the end result, but I have little to no understanding about the science regarding depth of field, and I really don't want to know.  I will use the word "focus" to discuss the end result, but it actually has to do with the way light is interpreted in camera not with camera focus.  I will also use the word sharp.  For those of you who want to understand the workings, I applaud you, but I'm not going to deal with it here.

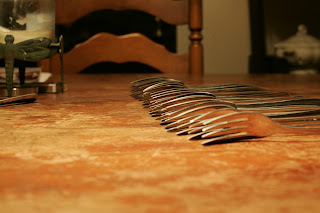
Depth of field defined by me is the part of the photograph that is sharp.  With a smaller F-stop less of the photograph will be sharp.  It is best understood by using examples.

 THis is a picture of forks.  It is taken with an F-stop of 1.4.   There are not many forks in focus.
 THis photograph was taken at F4.  There are a few forks in focus.
 THis photograph was taken at F8.  Almost all the forks are in focus.
This photograph was taken at F22.  Everything is in focus.

Just like shutter speed and ISO improper F-stop settings can result in an under/overexposed photograph.  With the F-stop set too low the photograph will be overexposed photograph with it set too large the photograph will be underexposed.   The other dynamic is the amount of the photograph that is in focus.  With a low numbered F-stop less of the photograph will be in focus and with a high numbered F-stop more of the photograph will be in focus.  This dynamic is called depth of field.

Depth of field is often used to focus attention, or to detract attention, and opens up many different opportunities for photographers, it is best demonstrated with examples.

This photograph was shot with an F-stop of 1.8.  It focuses attention on her finger, and should at least make the viewer wonder what the &%(*#$%^ is going on. 

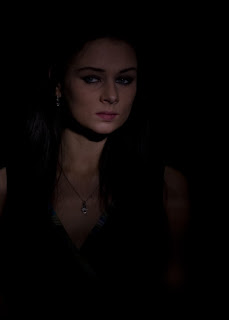
Just like in the fork examples here is a use of depth of field to focus attention on the model.   The camera was set to F4.


These were shot using F4 (F-stop 4) .  These photographs are meant to be symbolic of their relationship.


This photograph was shot at F22.  All of it needed to be in focus.  
This photograph also was shot at F22 for the same reason.

To conclude F-stop can be used to correct an over/underexposed photograph.  For an overexposed photograph the F-stop should have been set to a higher number, allowing less light to get to the sensor.  If the photograph was underexposed the photographer should have used a lower number allowing in more light.  So now you have three different ways to correct exposure: shutter speed, ISO, and F-stop.  There have been more books written on this than there are tics on a coon dog.  The trick for the photographer is deciding what to adjust and when.  My final post on controlling light will be to summarize.    


Monday, March 14, 2011

ISO

  ISO is usually stated on the camera as ISO 100, 200, 125, 160 etc. all the way up to 51000 each camera manufacturer may have variations.   It identifies the sensors sensitivity to light.  The lower the ISO number the less sensitive to light it is.  The higher the number the greater the sensitivity to light.  Also the higher the ISO the greater the chance for digital noise.  The noise can become so bad that it will make the picture ugly.  See discussion with examples in a previous post here:  http://grangerphotography.blogspot.com/2011/02/getting-that-camera.html

This leads to  the ISO balancing act.   You could use a high ISO and shoot, but then you would risk digital noise.  On the other hand you could shoot with lower ISO, and risk underexposed photographs.   The challenge then is to find the right balance.  Usually I will shoot at the lowest ISO I can to get a properly exposed photograph.  In this way I will avoid unwanted noise.  I have provided three examples.  The first photograph was shot at 100 ISO and is overexposed, in the second the ISO is 800 and is correctly exposed,  and the final photograph is overexposed.  In the final photograph the digital noise is quite noticeable if you click on it twice and look at the cabinet.
If you recall in the discussion regarding shutter speed:   http://grangerphotography.blogspot.com/2011/03/shutter-speed.html  we can control the amount of light getting to the sensor.   To correct the underexposed photograph above I could have slowed the shutter speed, and the first photograph would not have been underexposed.  In the final photograph I could have used a faster shutter speed and it would not have been overexposed.   Let's look at a couple of real examples:

There were a number of egrets and they were quite active.   I wanted to freeze action and used a shutter speed of 1/4000 of a second.  To achieve this I set my ISO to 160.
IN this photograph the swan was rather docile.  Again I wanted to freeze action, but I was not that concerned, and used shutter speed 1/250.  The ISO was 100. 


In this photograph it was just after daylight.  I set the ISO to the highest useable setting on my camera 800.  I set the shutter speed to 1/50.  I knew the shutter speed was iffy ( is that a word).  So I took a bunch of photographs hoping to catch them when they weren't moving.  I got lucky.  

This photograph was taken in a dimly lit room.  I used ISO 800 and shutter speed 1/20 of a second.  You can see the motion of his hand was not stopped by the shutter speed.   I consider it a useable photograph.
 
In this photograph ( last example) I used ISO 200 even though it was the middle of the day because I wanted a fast shutter speed.  I selected 1/3200 of a second to stop the action of the players and ball.

ON newer cameras useable ISO is getting higher and higher.  In other words there is less risk of digital noise making the selection of high ISO's less of a concern.   For my camera ISO 800 is about the top, but there are cameras now that are achieving  ISO of over 12000.  

To summarize:  In low light a slow shutter speed can be used or a higher ISO.  A slow shutter speed risks motion, and a high ISO risks digital noise.  

In bright light  a faster shutter speed and/or a lower ISO can be used, giving the photographer greater flexibility.   The photographer may choose just about any combination of shutter speed and ISO to get the right exposure.  

Next I will discuss F-stop.  It is the last way to control light in camera.  


Wednesday, March 9, 2011

Shutter speed

Finally, something I can sink my teeth into.

Photography is nothing more than recording light.  Light is more frequently talked about by Pros than cameras or lenses.  It is the understanding of  light and how to manipulate it that sets them apart.  In the next series of posts I will be discussing how you, yes you, can control light using camera settings.   There are three basic ways of controlling light in camera: shutter speed, F-stop, and ISO.   In this first post shutter speed will be the topic.

Cameras usually have a variety of different shutter settings.  While the shutter is open the camera will record all activity and will allow light to get to the sensor for a specific length of time. The speeds are usually stated as 15, 30, 60, 125 etc. but they are actually 1/15th a second, 1/30th a second, 1/60th a second and 1/125th a second.  There are some P&S's that do not allow for changes in settings, but most do.  DSLR's usually allow for much higher shutter speeds than P&S's.  Shutter speeds can be as fast as 1/8000th of a second. There will frequently be shutter speeds as slow as 30 seconds.  On many cameras there will also be a bulb setting.  With bulb you can slow the shutter speed to any length of time even a week (longer) if you choose.  It is important to understand shutter speeds effects motion and light.

Shutter speed has a direct effect on light.   The longer the shutter speed the more light gets to the sensor and a faster shutter speed  causes less light to get to the sensor.  If too much light gets to the sensor it will result in an overexposed photograph.   (Example)

 I should have used a faster shutter speed.  If the shutter is not open long enough the photograph will be underexposed.  Example:

I should have used a slower  shutter speed.


There are two types of motion, camera shake and subject motion.   Camera shake is caused by the photographer.  It is impossible to stand completely still (Just accept it please), and so with longer shutter speeds  the photographers motion will be recorded.  It will result in a soft ( A fancy way of saying blurry) picture.  Longer lenses exaggerate the motion.  A 400mm lens will show more shake than a 50mm lens.  Faster shutter speeds tend to overcome camera shake, but allows less light to reach the sensor.  It becomes a balancing act between light and motion to get the proper photograph.

 Consider this situation.  A photographer is at the Grand Canyon at daybreak.  He sets his camera up on a tripod, and adjusts the shutter speed to 1/15th of a second.  There is little light and the photographer has elected a slow shutter speed.  Our photographer becomes overwhelmed  with the beauty and falls into the canyon with his camera.  He knows he is about to die.  He decides to take one last photograph, and clicks the shutter.  Folks that photograph will be ugly.  He is moving at too great a speed, and he is shaking from fear.  There is not a chance his photograph will freeze action.  It will just be a blur.  This is the photograph:


Wait just before he hits the ground Superman appears and saves him. Just then the photographer sees an eagle diving at top speed in an effort to catch lunch.  The photographer politely asks Superman to help him take the picture.   Superman stops and holds the camera rock solid so there would be no camera shake.  The photographer clicks the shutter.  Yes he screwed up again.  Eagles can fly at around 40 MPH.  Subject blur.  Yes, that eagle is going way to fast for a shutter speed of 1/15th of a second.   This is the photograph:


The challenge for the photographer is to balance the need for shutter speed against the light of the subject.   I normally shoot sports or wildlife at no less than 1/500th of a second.  If it is dusk, sunrise, or a poorly lit gym, I may have to sacrifice shutter speed and risk blur to get the shot.  The blur may the result of camera shake or subject motion.   If you are shooting a 2 year old indoors then the challenge is to get the 2 year to stand still or use a fast shutter speed.  Super glue could be a solution, but frequently parents object.  So the answer is to increase shutter speed.   If there is not enough light to increase the shutter speed then the resulting photograph will probably go over to the dark side (underexposed).

This is the first step understanding light and photography.  Next I will add another element ISO to control light, and make the balancing act a little more difficult.

Sunday, March 6, 2011

Getting that Camera for Real

What camera should I get?  It is one of the most asked questions.  The short answer is the one you will use, and understand.  In fact I don't know what processed me to write this at all.  I bet most of you have a camera already.   Others will get theirs as a gift and still others will go to the store and get the one they can afford.  There are a bunch of cameras out there, and just as many Web Sites reviewing them.  I recommend:  (  http://www.dpreview.com/  )  I'm not even going to try to tell you which  one to get.  I use Canon, now.  I formerly used a Nikon.  Before that I shot Pentax.  Forgot Mamiya, it fit in there somewhere.   Right now I want to switch.  It is a costly deal to switch.  There are many good brands: Canon, Nikon, Pentax, Sony, Panasonic, Olympus, Fuji, Samsung, Ricoh, Leica  and I'm sure I have missed some.

Several years ago I was asked to shoot a tournament.  I never had.  I owned a Nikon camera that I swore I would have forever.  It is now gone.  I own three Canons.  After shooting the tournament I knew one thing for sure.  I owned the wrong lens.  Not the wrong camera the wrong lens.  The most important decision is the lens.  No one asks me about lenses they ask about cameras.   They would be better of to ask about lenses.  You would be better off buying any old camera and getting a good lens.  I beat this to death in the previous post and now I'm done.

Today I am considering a new camera.  I already have good lenses (I just can't keep from talking about lenses).  My first thought is to continue with canon, but....(There is always a but) .   Brand identification can lead you down a very bumpy road indeed.  Just so you know I think Canon produces a great line of cameras.  I own 3 of their cameras, all my lenses they make, and I use their flash guns (Another problem) Now the story.

Canon produced the 1D Mark III.  It would take 10 frames a second, 10 megapixel, sealed against weather, with more settings than a person can count.  It was a sport or wild life shooters dream camera.  Except....it had a problem focusing.  Well, if the subject was stationary it did the job, but if the subject was moving....not good (remember sports wildlife) .  Canon after pressure from purchasers, and reviews and about 9 months bent to pressure.  They agreed to fix of the cameras and redesigned the model.  The designed model worked and the fix worked.  The camera cost about $4700.  Yes $4700.  It wouldn't focus.  So what did they do next?  They released the 5D Mark II and guess what.  Yeah there are problems with the focus.  It only costs $2500, but..... I frequent a site that publishes user reviews.  On the first page of the site there are 12 reviews, 8... yes  8 complain about the focus.  Check it out here:                                                                      (  http://www.fredmiranda.com/reviews/showproduct.php?product=368&sort=7&cat=15&page=1  ).  
In defense there are a number of great photographers that use the 5D Mark II and the 1D Mark III.  One of my favorites uses the the 5D Mark II ( He has published many books).  Just the same focus problems.  It is kinda like buying a new car and then being told, "It drives well as long as you go straight."  There are two lessons first don't be the first to buy.  Wait see if there are any problems with that new model.  Second lesson is even the leader can trip, stumble and fall.  Choose carefully it will be your camera for several years.

So let's get down to it.  The big decision is between DSLR (interchangeable lens camera) and P&S (cameras with out interchangeable lenses) cameras.  If you have always used a P&S and have been satisfied. I suggest you buy another.  If you are dissatisfied then you have another decision, get another better P&S or DSLR.  I am tempted to quit right now, but I feel the need to confuse you readers.

Outside of the interchangeable lens thing there are some more subtle differences.  The sensor, the thing that actually records the picture, are larger in DSLRs.  The advantage of a larger sensor is it can record more information.  Think of it this way.  Lets just say I wrote this on facebook.  I would have gotten that alert that says too many character a long time ago, less room.  I know some of you may like that, but for a camera more information is better.  It gives more detail.  More like this blog.  If you are going to only print 4x6 inch prints or post on the net it doesn't make much difference, but if you are putting it on a billboard.....Well you get the drift.  Next a P&S is easier to carry.  It will slip into a purse or pocket and some are so light they can stay there.  There are some P&S cameras that are too large for this and look more like traditional cameras.  They usually have more bells and whistles.  There just isn't a DSLR camera made that will go into a pocket and they will be too heavy for a purse.  A lot of pro photographers buy P&S's because of their convenience.   The next difference is ISO.   A higher ISO will allow you to get pics with less light.  (Has to do with that sensor thing)  DSLR's usually have higher useable ISO's because of the larger size.  THe final difference is the flash.  (discussed here) Usually DSLR's have a superior flash because they can add more light than P&S's.  Most, not all, P&S's have rather anemic flashes.  They will light about 10 feet give or take a foot or two.  DSLR's can have an onboard flash, hot shoe or both. A hot shoe is on top of the camera and can be used to attach a flash (purchased separately).   The hot shoe flash is the most powerful. (A few P&S's do have a hot shoe)


Confused yet?  Ok here is more simple version.

DSLR's usually have better optics, but not always.  (I know I keep saying that about the lens)
DSLR's have larger sensors which are better.  P&S's will usually provide prints up to at 8x10's and                                     probably 11x14's.
DSLR's usually have better ISO performance than P&S's. (Negating use of flash in some instances.)
DSLR's usually have better flashes than P&S's.
DSLR's are difficult to carry and will spend time at home. P&S's are not heavy and are easy to carry.
DSLR's cost more.
DSLR's are more complex to use properly.  (usually)

There are other differences, and differences between different DSLR's and different P&S's.  Anyone who wants to chime in the comments please do so.  Also take note the number of times I said "usually", there just aren't many absolutes.  Finally if you want my assistance when buying just ask, or if you own and want my help operating your camera, just ask.  That would be easier than trying to evaluate all those cameras out there.   Still the easiest answer is  "Get the one you will use and will take the time to understand."

A special thanks to Irene.  She said,  "Ted why not add pictures."  I know.   I am a photographer, and that should have come to mind quickly....

Photography is all about light.  I know you thought it was about taking a photograph, but no it is about light.  So next is shutter speed, then ISO, then F-stop.  I promise these will be shorter and will have more pictures thanks to Irene.  http://www.dpreview.com/